
Custom Dialog
업데이트:
Custom Dialog를 사용하는 방법을 알아보고자 합니다.
기본 Alert Dialog가 아닌, 특별한 구성의 dialog를 만들때, Custom Dialog를 사용해야합니다. 개발팀에서 자주 사용하는 패턴 입니다.
Usage
CustomDialog 구성
Custom Dialog를 만들기 위해서는, 우선 Dialog 상속 받은 Class를 생성해야 합니다. 코드로 살펴보겠습니다.
public class CustomProgressBar extends Dialog {

    private Context context;
    private RelativeLayout mRelativeLayout;
    public Button cancelButton;

    public CustomProgressBar(Context ctx) {
        super(ctx);
        context = ctx;
    }

    @SuppressLint("ResourceType")
    @Override
    protected void onCreate(Bundle savedInstanceState) {
        super.onCreate(savedInstanceState);

        setContentView(R.layout.progressbar_animation);

        mRelativeLayout = (RelativeLayout) findViewById(R.id.rl_animation_background);

        ...

        /* Dialog 하단의 Button 구성 */
        RelativeLayout.LayoutParams cancelButtonParam = new RelativeLayout.LayoutParams(
                RelativeLayout.LayoutParams.WRAP_CONTENT,
                RelativeLayout.LayoutParams.WRAP_CONTENT);

        cancelButtonParam.width = pixels - 100;

        cancelButton = new Button(context);
        cancelButton.setText("Cancel");
        cancelButton.setLayoutParams(cancelButtonParam);
        cancelButton.setTextColor(Color.WHITE);
        cancelButton.setBackground(context.getResources().getDrawable(R.drawable.orange_button_bg));
        cancelButtonParam.addRule(RelativeLayout.BELOW, 2);
        cancelButtonParam.addRule(RelativeLayout.CENTER_HORIZONTAL);

        /*
        relativeLayout 에 생성한 View를 addView 해준다.
        xml에서 직접 만들 수 도 있지만, 여기에서는 programmatically 하게 View를 생성하였다.
        */
        mRelativeLayout.addView(relativeLayout, backgroundParams);
        mRelativeLayout.addView(mAnimationView, lottieParams);
        mRelativeLayout.addView(textView, textViewParam);
        mRelativeLayout.addView(cancelButton, cancelButtonParam);
    }

    public Button getCancelButton() {
        return cancelButton;
    }
}
onCreate에서는 custom dialog에 보여질 View들을 구성합니다. 여기에서는 View들을 programmatically하게 구성하였으며, 전체 소스는 gitbub을 참조 하시면 됩니다. ___
CustomDialog 생성 및 제거
CustomDialog은 일반적으로 여러곳에서 호출하여, 사용합니다. 그래서 show, dismiss하는 class를 생성하였습니다.
public class ProgressBarManager {

    private CustomProgressBar mCustomProgressDialog;
    private Context context;

    public ProgressBarManager(Context ctx) {
        context = ctx;
    }

    public void showProgress(MainActivity.CancelProgressBar listener) {

        mCustomProgressDialog = new CustomProgressBar(context);
        mCustomProgressDialog.getWindow().setBackgroundDrawableResource(android.R.color.transparent);
        mCustomProgressDialog.show();

        mCustomProgressDialog.getCancelButton().setOnClickListener(view -> listener.onEvent());
    }

    public void dismissProgress() {
        mCustomProgressDialog.dismiss();
    }
}
ProgressBarManager의 showProgress 메서드에서는 CustomProgressBar를 생성하여, show()를 호출 합니다. CustomProgressBar는 Dialog를 상속 받았습니다. 그래서 구성 한 View를 다른 class에서 show() 호출로 Dialog를 생성하게 합니다. ___
CustomDialog 호출
CustomDialog를 activity에서 호출하게 하였습니다. Dialog는 일반적으로 생성 후 제거 해야 합니다. 여기에서는 dialog를 호출한 MainActivity로 Dialog의 Click Event가 전달 되게 하였습니다. 코드로 추가설명 드리겠습니다.
public class MainActivity extends AppCompatActivity {

    private ProgressBarManager manager;

    public interface CancelProgressBar {
        void onEvent();
    }

    private CancelProgressBar cancelListener;

    @Override
    protected void onCreate(Bundle savedInstanceState) {
        super.onCreate(savedInstanceState);
        setContentView(R.layout.activity_main);

        cancelListener = new CancelProgressBar() {
            @Override
            public void onEvent() {
                manager.dismissProgress();
            }
        };

        manager = new ProgressBarManager(this);
        manager.showProgress(cancelListener);
    }
}
CancelProgressBar라는 callback listener를 생성하고, showProgress에 listener를 전달하였습니다. 이 listener를 통해, Dialog에서 생성한 Button이 클릭 되었을때, listener.onEvent()를 전달 할 수 있습니다. Dialog가 클릭 되면, MainActivity에 생성해 놓았던, listener의 onEvent()가 callback으로 호출 되게 됩니다. onEvent에서는 dismissProgress를 불러, dialog를 제거 하게 합니다. ___
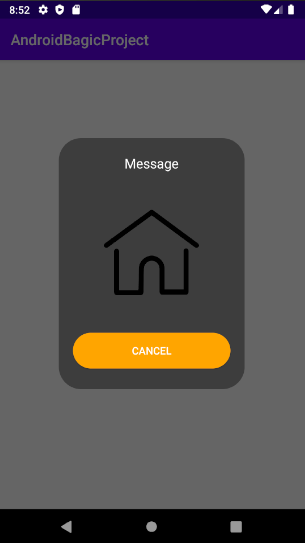
Output
MainActivity의 화면 입니다. CANCEL 버튼을 누르면, CustomDialog를 dismiss 하게 구현 하였습니다.
 ___
___
Source
- 전체 소스 : GitHub
- branch : custom_dialog